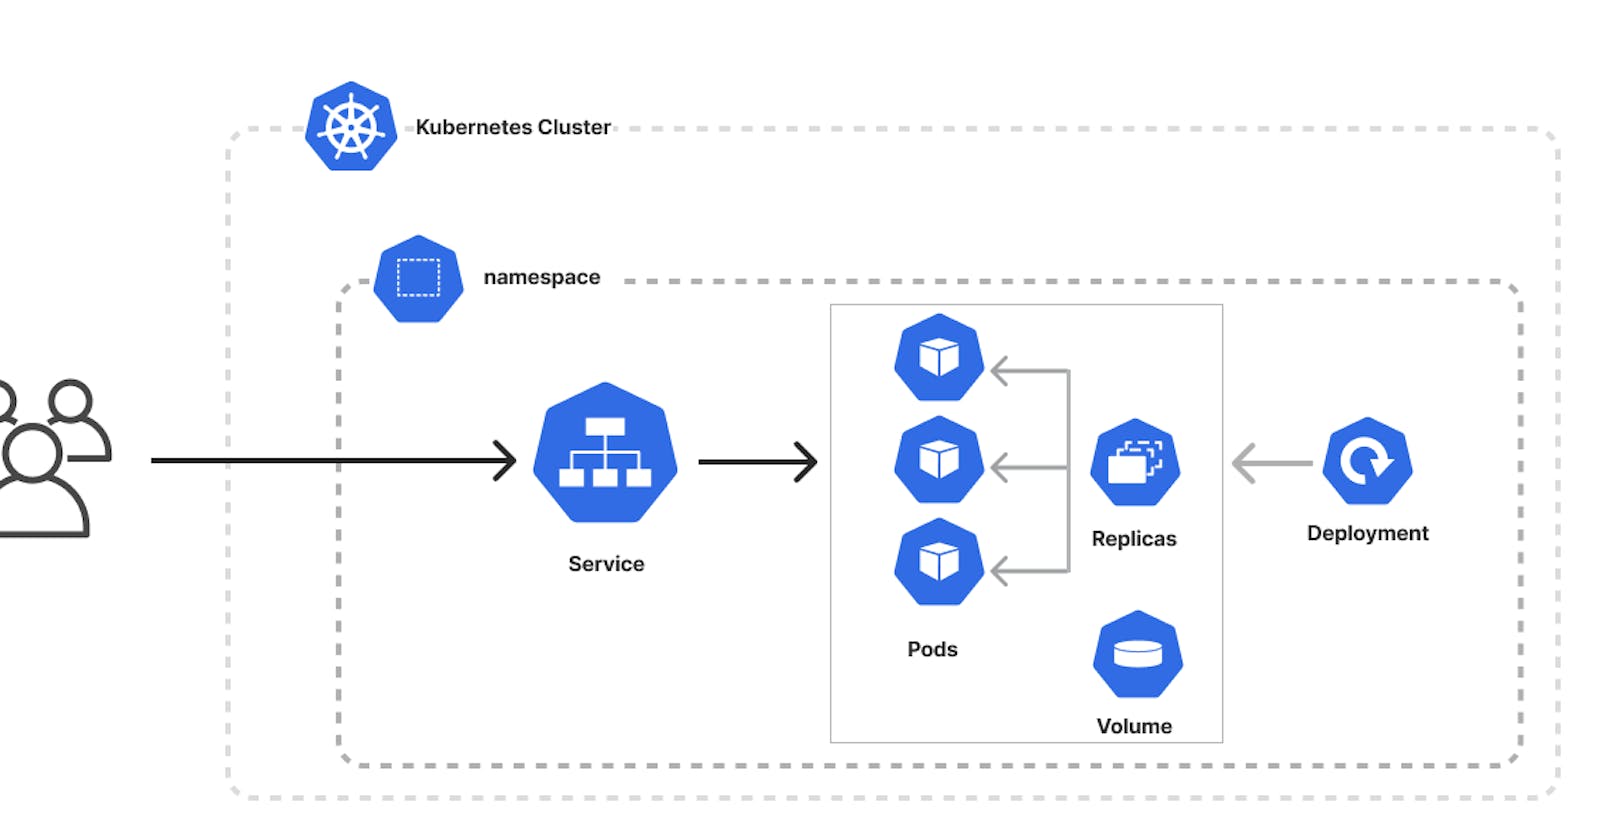
💥Introduction:
In this project, we have a Flask web app 🌐 that displays the host on which it's currently running and showcases messages injected by a script.📜 For seamless functionality, it needs to be integrated with MongoDB 🍃. Now, as a DevOps engineer 👷♂️, our task is to deploy this application on a Kubernetes cluster using Kubeadm .🚀
💥Installation Guide K8s:
Please proceed with the following instructions to configure the Kubernetes cluster.
🚀Both Master & Worker Node
Run the following commands on both the master and worker nodes to prepare them for kubeadm.
sudo su
apt update -y
apt install docker.io -y

systemctl start docker
systemctl enable docker

curl -fsSL "https://packages.cloud.google.com/apt/doc/apt-key.gpg" | sudo gpg --dearmor -o /etc/apt/trusted.gpg.d/kubernetes-archive-keyring.gpg
echo 'deb https://packages.cloud.google.com/apt kubernetes-xenial main' > /etc/apt/sources.list.d/kubernetes.list

apt update -y
apt install kubeadm=1.20.0-00 kubectl=1.20.0-00 kubelet=1.20.0-00 -y
🚀Master Node
Initialize the Kubernetes master node.
 sudo su
 kubeadm init
Set up local kubeconfig (both for the root user and normal user):
 mkdir -p $HOME/.kube
 sudo cp -i /etc/kubernetes/admin.conf $HOME/.kube/config
 sudo chown $(id -u):$(id -g) $HOME/.kube/config
Apply Weave network:
kubectl apply -f https://github.com/weaveworks/weave/releases/download/v2.8.1/weave-daemonset-k8s.yamlGenerate a token for worker nodes to join:
kubeadm token create --print-join-commandExpose port 6443 in the Security group for the Worker to connect to the Master Node
🚀Worker Node
Run the following commands on the worker node.
 sudo su
 kubeadm reset pre-flight checks
Paste the join command you got from the master node and append
--v=5at the end.
🚀Verify Cluster Connection
On Master Node:
ahmed@master:~/TWS-Project/flask_mongodb$ kubectl get nodes
NAME     STATUS   ROLES                  AGE   VERSION
master   Ready    control-plane,master   14h   v1.20.0
node-1   Ready    <none>                 14h   v1.20.0
💥Flask-Microservice- Project:
Run the following commands on the worker node.
ahmed@master:~/git clone https://github.com/ahmednisarhere/K8s-flaskapp-Mongodb.gitCreate a Dockerfile for the Flask app.
 FROM python:alpine3.7
 WORKDIR /app
 COPY app.py requirements.txt /app/
 RUN pip install -r requirements.txt
 EXPOSE 5000
 CMD ["python", "app.py"]
Build the Dockerfile and push it to DockerHub for K8s deployment.
 docker build . -t flaskapp
 docker login
 docker tag <your-dockerhub-id>/microservice:latest
 docker push <your-dockerhub-id>/microservice:latest
Create a microservice "deployment.yml" for the microservice container.
 apiVersion: apps/v1
 kind: Deployment
 metadata:
   name: taskmaster
   labels:
     app: taskmaster
 spec:
   replicas: 1
   selector:
     matchLabels:
       app: taskmaster
   template:
     metadata:
       labels:
         app: taskmaster
     spec:
       containers:
         - name: taskmaster
           image: ahmed0001/flask-app:latest
           ports:
             - containerPort: 5000
           imagePullPolicy: Always
To access the Flask app from outside the cluster we have to create a service manifest file "service.yml". In K8s, three types of services were used that is node port, ClusterIP, and LoadBalancer. Here in microappservice.yml port was mapped target port and the port was assigned with node port 30001 for microservice
 apiVersion: v1
 kind: Service
 metadata:
   name: taskmaster-svc
 spec:
   selector:
     app: taskmaster
   ports:
     - port: 80
       targetPort: 5000
       nodePort: 30001
   type: NodePort
Create a MongoDB database "mongo-deployment.yml"
 apiVersion: apps/v1
 kind: Deployment
 metadata:
   name: mongo
   labels:
       app: mongo
 spec:
   selector:
     matchLabels:
       app: mongo
   template:
     metadata:
       labels:
         app: mongo
     spec:
       containers:
         - name: mongo
           image: mongo
           ports:
             - containerPort: 27017
           volumeMounts:
             - name: storage
               mountPath: /data/db
       volumes:
         - name: storage
           persistentVolumeClaim:
             claimName: mongo-pvc
Check if there is a storage class that is up and running and if not then we have to create one.
kubectl get scIf a storage class doesn't exist, it's necessary to create one "storageclass.yml", before applying the persistent volume.
 apiVersion: storage.k8s.io/v1
 kind: StorageClass
 metadata:
   name: standard
 provisioner: kubernetes.io/gce-pd
 parameters:
   type: pd-ssd
 reclaimPolicy: Retain
 allowVolumeExpansion: true
 mountOptions:
   - debug
 volumeBindingMode: Immediate
Apply the storage class and make it default if there is no default class is there
 # apply the storageclass
 kubectl apply -f storageclass.yml

 # make this storageclass default
 kubectl patch storageclass standard -p '{"metadata": {"annotations":{"storageclass.kubernetes.io/is-default-class":"true"}}}'
To store the data Mongodb requires one persistent volume. Make sure to run this command before applying this pv "sudo mkdir -p /tmp/db". In this file, I have assigned 500 MB for MongoDB to store the data with a temporary path /tmp/db.
apiVersion: v1
kind: PersistentVolume
metadata:
  name: mongo-pv
  labels:
    type: local
spec:
  storageClassName: <enter your storageclass name>
  capacity:
    storage: 500Mi
  volumeMode: Filesystem
  accessModes:
    - ReadWriteOnce
  persistentVolumeReclaimPolicy: Retain
  hostPath:
    path: /tmp/db
Now we have to assign the particular volume to the MongoDB which we have taken from the host so we have to write a volume claim persistent file
"mongo-persistentvolumeclaim.yml".
apiVersion: v1
kind: PersistentVolumeClaim
metadata:
  name: mongo-pvc
spec:
  accessModes:
    - ReadWriteOnce
  resources:
    requests:
      storage: 250Mi
Now we have to create a "mongo-service.yml" so it can communicate within the cluster.
apiVersion: v1
kind: Service
metadata:
  labels:
    app: mongo
  name: mongo
spec:
  ports:
    - port: 27017
      targetPort: 27017
  selector:
    app: mongo
Now all the necessary manifest files are created and we have to deploy the all manifest files
kubectl apply -f taskmaster.yml,taskmaster-svc.yml,mongo.yml,mongo-svc.yml,mongo-pv.yml,mongo-pvc.ymlCheck the all manifests individually if they are in running state
kubectl get pods
kubectl get deployments
kubectl get services
kubectl get pv
kubectl get pvc
Go the Web browser and type the below link
http://localhost:30001/
To insert data in Mongodb perform this command
curl -d '{"task":"Hi How are you?"}' -H "Content-Type: application/json" -X POST http://localhost:30001/task
curl -d '{"task":"I have done this project"}' -H "Content-Type: application/json" -X POST http://localhost:30001/task
Go the URL localhost:30001/tasks

✨Conclusion:
In conclusion, the deployment of a two-tier application on Kubernetes (K8s) has illustrated the platform's ability to efficiently manage complex software architectures. This approach has resulted in improved scalability, resilience, and ease of maintenance, making it a valuable solution for modern application deployment and management.
